Sweet Tart Crust (Pâte Sucrée)
03 July 2019 by Natanja
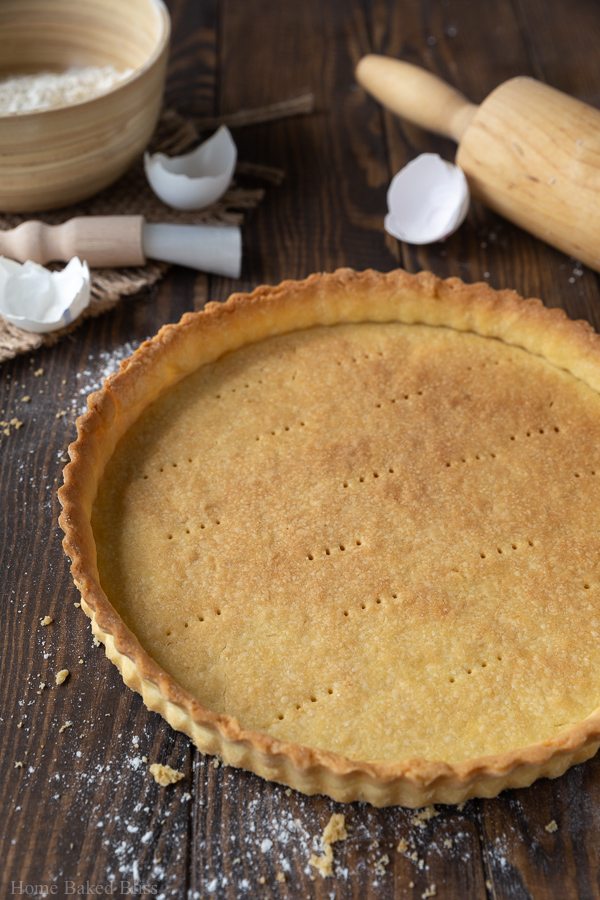
A sweet and buttery tart crust that is easy to work with and tastes amazing with any fruit or cream filling of your choice. Making your own tart shell has never been easier!
If there’s anything that I’ve learned from binge watching Zumbo’s Just Desserts on Netflix for the past few weeks, it’s there’s nothing basic about pastry dough. It’s a science of its own and there is a lot of precision that goes into it. Needless to say, I’ve spent the past 2 weeks making pâte sucrée like a maniac, trying to figure out what exact ratios and methods result in the perfect crispy tart crust. (I have an endless stash of frozen dough to prove it too.)
The perfect tart crust is light in texture and buttery in flavour. The more butter you add the better it tastes but also the more difficult it becomes to handle. And just like Zumbo and Rachel Khoo mentioned (about 1000 times) on the show, the thiner the pastry, the better. Obviously the thinner the pastry, the more fragile it becomes. So there I was trying to get two conflicting characteristics into one tart dough. I wasn’t going to stop until this was the tastiest and thin pastry crust (that’s easy to handle though) you’ve ever tried. I’m happy to report that after a ridicules amount of recipe testing, I’ve finally made a tart that has all those lovely characteristics.
Pâte Sucrèe
As mentioned, today we are making a pâte sucrée as a base for a sweet tart. In my humble opinion, pâte sucrée is the ideal pastry for sweet tarts, as its cookie like texture creates the perfect base for various fruit and cream fillings. It holds its shape nicely and is easy to work with, making it the ideal dough for pastry newbies.
Speaking of newbies, I broke down this recipe in lots of detailed steps with photos to go along. Don’t be intimidated by all the info, I just like to be very thorough. 🙂 If you have made tart dough before or feel confident enough, go ahead and skip right down to the recipe.
Let’s get started!
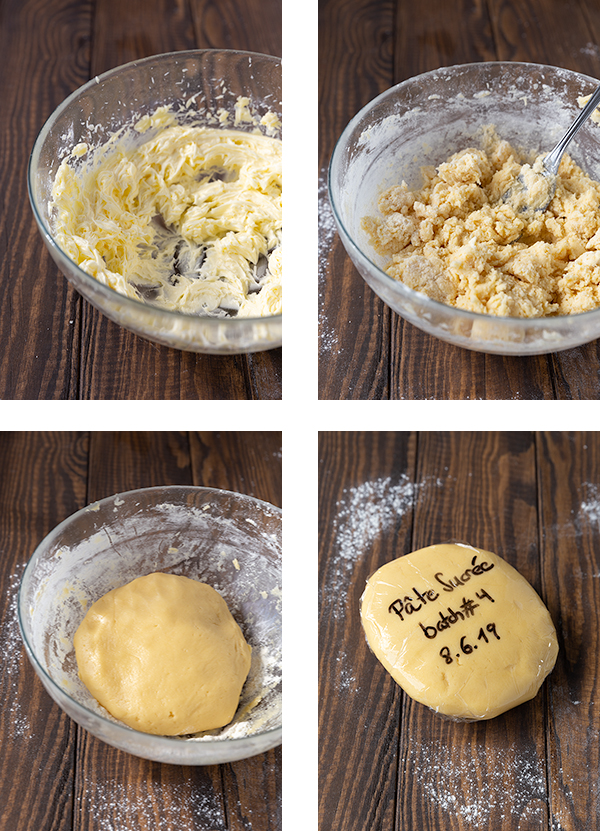
Pâte sucrée starts off with the so called “creaming method”, namely creaming together the butter and powdered sugar. In order for your butter and sugar to come together, it’s important to work with room temperature butter. Cream the butter and sugar until pale and fluffy in a stand-mixer on medium-speed. With the mixer running on low speed, add in the egg.
Sieve the flour and switch the attachment of your stand mixer to a dough hook. With the mixer running on low speed, add in 1/3 part of the flour at a time. Continue kneading until you have a uniform dough. Once your dough is smooth, stop kneading to prevent the dough from becoming overworked.
Shape the dough into a disc shape and wrap tightly in plastic wrap. Chill the dough for at least 1 hour (or up to 3 days). It may be tempting to cut away from that time but I urge you not to. The dough needs enough time to chill and rest so that it will hold its shape when baking.
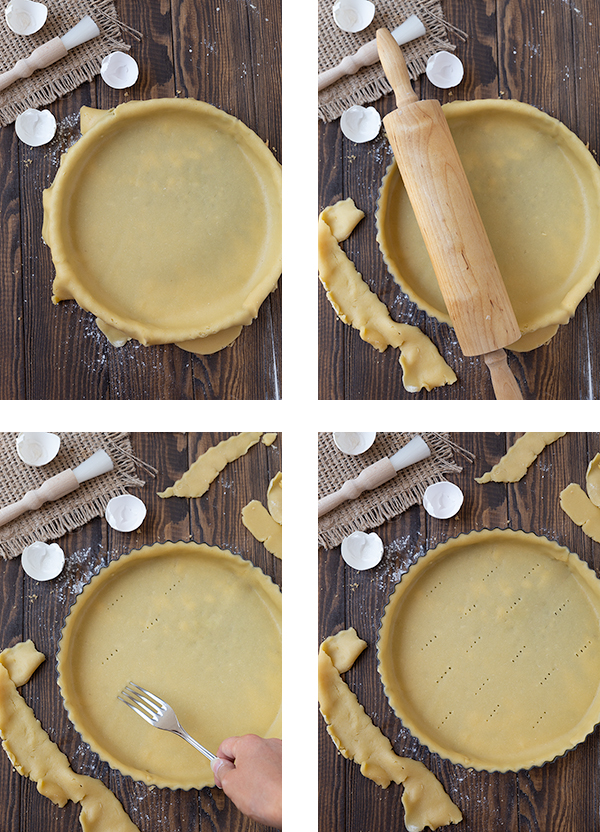
Once your dough has chilled, remove it from the fridge and let it warm up a bit for about 10 minutes. Then roll it out on a floured surface to about 27cm or 11 inches. The tart dough should be slightly bigger than your tart pan.
Carefully transfer the dough to your tart pan. The easiest way to do this, is by rolling it halfway onto your rolling pin, and gently lifting it over and into the tart pan. Then pat (again gently!) the dough into the tart pan making sure not to stretch the sides as this could cause your tart dough to shrink while baking.
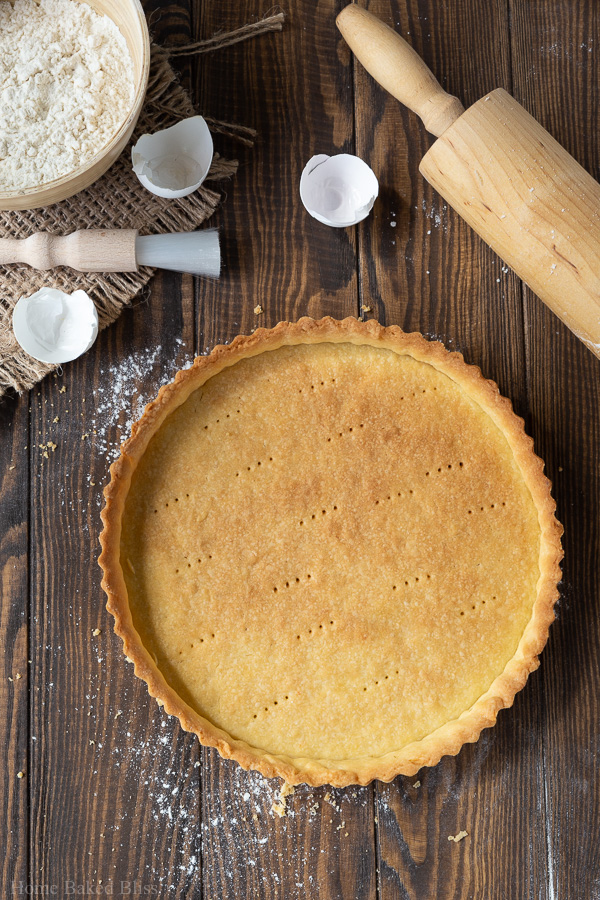
Remove any overhang by rolling the rolling pin over the sides of your tart pan or cutting it off with kitchen scissors. Then prick the bottom of the dough multiple times with a fork and let it chill in the freezer for 15 minutes or in the fridge for 30 minutes.
Stand Mixer
I prefer using a stand mixer for pâte sucrée because it quickens the process and makes mixing a breeze. If you do not own one, you can still make the recipe with a hand mixer. You may have to add a few minutes when creaming together the liquid ingredients to ensure that the butter fluffs up nicely and the egg and cream are incorporated thoroughly.
Tips for the Perfect Tart
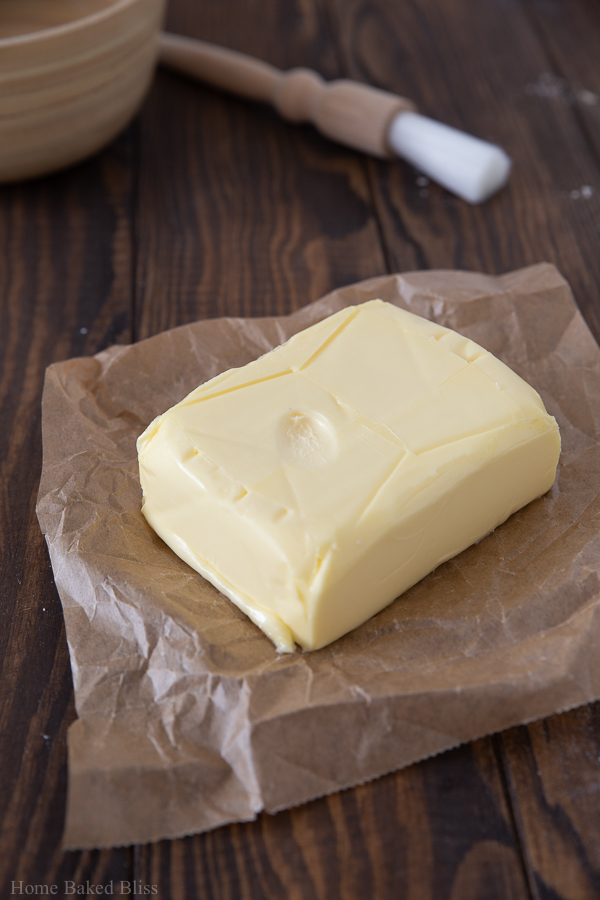
- Use softened butter like the recipe calls for. The butter should be soft but not too soft. If you can make a dent in it with your finger, it’s ready to use.
- Always blind bake your tart crusts before adding any liquidy fruit fillings to prevent a soggy bottom.
- Experiment with flavourings of your choice (think citrus zest, vanilla beans, almond extract,..) but do not change the ratios of the base ingredients.
- Do not add too much flour to your work surface as this could cause your dough to become tough and dry. A lightly floured is the way to go.
- Bake the tart in the middle of your oven so the heat can circulate, cooking the tart evenly.
Blind Baking (a.k.a Pre-baking)
As mentioned, blind baking is the key to a crispy bottom tart when working with a liquidy filling…but what exactly is blind baking? When you are blind baking tart dough, you are essentially cooking it slightly before adding in your filling. The bottom of your tart gets sealed and doesn’t take on as much moisture as it would when raw. To blind bake your tart, cover the dough with a sheet of parchment paper and fill with pie weights or dried legumes (eg. beans, chickpeas, lentils) to weigh the parchment paper down. This prevents your dough from rising as it bakes. Always pre-bake your tart according to the recipe.

Sweet Tart Dough (Pâte Sucrée)
- Prep Time: 10 minutes
- Total Time: 1 hour 10 minutes (includes chilling time)
- Yield: 1x 22cm (9-inch) sweet tart crust 1x
Description
A sweet and buttery tart crust that melts in the mouth.
Ingredients
- 70g butter, softened (1/3 cup)
- 50g powdered sugar (1/2 cup)
- 1 medium egg
- 180g all purpose flour (1 and 1/2 cups)
- 1/4 teaspoon salt
Instructions
- In the bowl of your stand mixer, beat the butter and sugar until pale and fluffy, about 3 minutes.
- With the mixer running on low speed, add in the egg and continue mixing until well incorporated.
- Sieve the flour and switch the attachment of your stand mixer to a dough hook. With the mixer running on low speed, add in 1/3 part of the flour at a time as well as the salt. Continue kneading until you have a uniform dough. Once your dough is smooth, stop kneading to prevent the dough from becoming overworked.
- Shape your dough into a disc shape and wrap tightly in plastic wrap. Chill the dough for at least 2h or overnight.
- Once your dough has chilled, remove it from the fridge and let it warm up for about 10 minutes. Then roll it out on a floured surface to about 27cm or 11 inches.
- Carefully transfer the dough to your tart pan. The easiest way to do this, is by rolling it halfway onto your rolling pin, and gently lifting it over and into the tart pan. Then gently pat the dough into the tart pan making sure not to stretch the sides.
- Remove any overhang by rolling the rolling pin over the sides of your tart pan or cutting it off with kitchen scissors. Then prick the bottom of the dough multiple times with a fork and let it chill in the freezer for 15 minutes or in the fridge for 30 minutes. Use the dough as the recipe calls for.
Notes
If you wish to use the tart crust for a filling that does not need to be baked, spread a layer of parchment paper over the chilled dough and fill with pie weights or dried legumes. Bake in the preheated oven at 180C for 10 minutes, then uncover and bake for another 10 minutes or until golden brown. Let it cool completely.
Tart dough keeps really well, whether in the fridge or in the freezer. You can prep the dough up till step 4 and keep it in the fridge for up to 3 days or freeze it up to 3 months. When frozen, let the tart dough thaw overnight in the fridge before using.
MORE FROM MY SITE
Disclosure: This post may contain affiliate links, but these are all products I highly recommend. I won’t put anything on this page that I haven’t verified and/or personally used.
Tagged With: dough, pastry, tart, tart dough
Filed Under: Pies & Tarts