The Best Gluten Free Pie Crust
08 March 2016 by Natanja

Going gluten-free is not always easy and often disappointing when results are not the way you expected them to be. This pie crust however, is not complicated to make, great to roll out and crimp, and it tastes really good. Finally, a no-fail recipe for gluten-free pies!
This recipe is the result of hours of work, frustration, excitement and finally- happiness. As I am not gluten intolerant myself, I didn’t have experience with gluten-free flours. However, a lot of people I know are, and thus I decided to come up with a recipe so they could enjoy great pie as well. If you don’t regularly bake with gluten-free flour, the best tip I can give you is to consult people who are intolerant. Most often they will know which brands are good (there are MAJOR differences) and can give you great tips.
The big differences when baking with gluten-free flour you need to keep in mind are
1). Buy from a trusted brand.
2). Although traditional pie crust is made without an egg in the dough, for a gluten-free pie crust you do need one. The gluten-free flour is drier than normal flour and the egg really helps with holding everything together and giving some moisture.
3). The dough is slightly stickier to work with and more fragile, so be gently and don’t rush.
4). Chilling is mandatory, do not skip any of the chilling steps!
5). Never pour all the water in immediately, rather start with 1/2 cup and always test the consistency.
I also wanted to make this pie crust lactose free and I experimented with dairy free butter. I discovered once more- there are MAJOR differences. To give you somewhat of a guideline though, for a pie crust you want to opt for fat which holds its shape. The perfect pie dough has visible swirls of fat. This is exactly what you want. The chunks of butter melt in the oven creating steam pockets which results in a flaky texture. Some of the dairy free types of butter are soft, even when stored in the fridge. Boycott those! Buy a butter which resembles real butter closely by texture as well as flavor. I prefer Flora which is just like working with real butter.
Now let’s go through the recipe step-by-step. If you want to make an open face pie, simply cut the recipe in half.
Combine flour, salt and sugar in your food processor and pulse a few times to mix. Then add in the butter pieces and pulse to combine. You should have pea size butter pieces in your flour mixture.

Then add in the egg and pulse a few times again. Once that is done, add in the ice water. Don’t add it in all at once but start with ½ cup and add more if necessary. You should be able to make a print with your hands in the dough as such:

Form 2 equal size balls and wrap them in clear foil. Roll the dough out slightly to get a disc. This will help the dough to chill evenly and make the next step easier. Chill the dough discs for at least an hour or up to 2 days in the fridge.

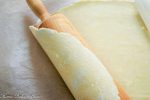
Roll out your dough on a generously floured surface. Make sure to flour the rolling-pin regularly when working. Keep rolling until the dough fits your pie plate and you have some overhang.


To transfer the dough into your pie dish, slightly roll it unto the rolling-pin. Use the rolling-pin to gently lift the dough into the pie dish. Tip: Keep the pie dish as close as possible so you don’t have to lift it far.
Cut away excess on the sides with kitchen scissors, but leave some overhang for crimping later.
If you are making an open face pie, crimp the edges by forming a U-shape with your thumb and index finger and then pushing your other thumb between that space. I hope that somehow makes sense to you. Brush with a whisked egg white and chill once more before filling.
If you are making a double crust pie brush with a whisked egg white and chill while preparing your filling.
Add filling of your choice. Then roll out the second disc and sculpt over the filling. Once more, cut away any excess.


Tuck the bottom edges over the top and crimp together. And viola, you have an amazing gluten-free (and lactose free) pie crust.
Gluten Free Pie Crust
- Total Time: 25 minutes
- Yield: 2 dough discs 1x
Description
A foolproof gluten free pie dough recipe
Ingredients
- 240g gluten free flour (2 cups)
- 1/4 teaspoon salt
- 2 tablespoons granulated sugar
- 150g butter or dairy free butter, chilled (2/3 cups)
- 1 large egg
- 115ml ice water (1/2 cup), plus 1-2 tablespoons
- 1 egg white, whisked (optional)
Instructions
- Mix the flour, salt and sugar in a food processor and pulse until combined.
- Cut the chilled butter into cubes and freeze for 10min. Then add to the flour mixture, pulse until butter pieces are pea sized.
- Add in the egg and pulse twice. Then add in the ice water, starting with 115 ml (1/2 cup) and adding more if necessary. The dough should stick together but not be too sticky to handle.
- Roll into 2 equal size balls and cover with foil. With a rolling pin, flatten into discs. Then chill for at least an hour or up to 2 days in the fridge.
- Roll out the chilled dough, slightly bigger than the pie dish. Transfer to the pie dish and brush with a whisked egg white. Chill while preparing the filling. Or stop here and make an open face pie.
- If making a double crust pie, fill your pie. Roll out the second disc and sculpt over the filling. Crimp and add slits to let out steam. Bake according to chosen recipe.
Keywords: gluten free pie crust
MORE FROM MY SITE
Disclosure: This post may contain affiliate links, but these are all products I highly recommend. I won’t put anything on this page that I haven’t verified and/or personally used.
Tagged With: gluten free, gluten free pie, pie crust
Filed Under: Pies & Tarts