Toffee Thumbprint Cookies
16 January 2016 by Natanja
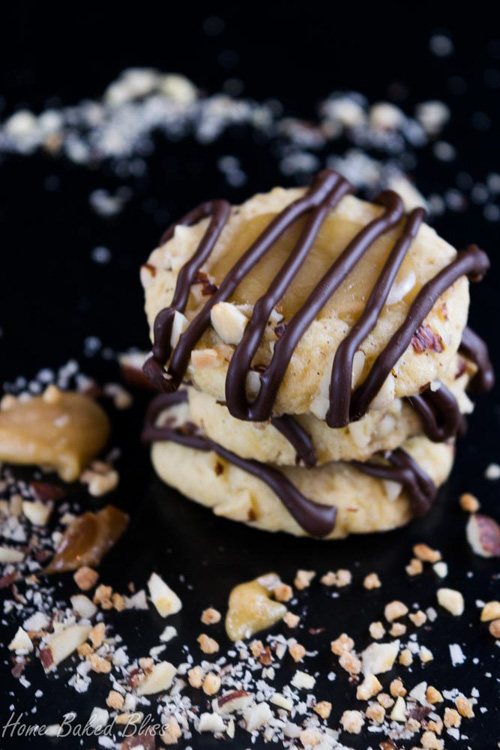
Seriously addictive toffee thumbprint cookies with caramel filling. The combination of crunchy hazelnut, soft sticky toffee and chocolate is to die for.

I have been making these cookies, or actually an adaption of them, for years. I found them in a cooking magazine back in 2012 and they have been a keeper ever since. They are part of my Christmas cookie collection, and friends and family always love receiving them. Christmas seemed to pass by in a rush and stores are already stocking up for Valentine ’s Day! It’s crazy how holidays always seem to pass by so quickly. Throughout all the stress I enjoy taking the time and baking cookies – in January.
These cookies require, several steps, but don’t worry- here is your step-by-step guide. Start off by chopping hazelnuts into small pieces. Once you’ve done that, put them in a deep dish and continue with making the dough.
Combine the ingredients for the dough in a stand mixer and cream together until it’s a homogeneous mass. Then form a teaspoon of your mixture into a round ball. Do this with wet hands- the dough won’t stick to your hands this way.


Roll that ball in the chopped hazelnuts and put onto a baking tray.
Now for the next step I used my index finger (despite the cookies being called THUMBprint cookies). Calling them indexprint cookies would have probably caused some confusion :). Pock into the center of the cookie, until you have a nice little pool. Like this:


Bake and let cool completely. Optimally, you should have 2-3 baking trays where you alternate and prepare the next ones while some are in the oven. This recipe yields quite a large amount of cookies, about 70! It will come in handy to work with multiple baking trays.
When making the toffee, combine all your ingredients and bring them to a boil and then reduce to small heat. The caramel should bubble a lot and you’ll know once it’s done when you take a small amount of it out, let it cool and then try to roll it between your fingers. If it’s finished cooking it will roll easily, if it’s too sticky, it still needs some time.


Work quickly and fill your cookies before the toffee firms up or you won’t be able to pour it anymore. It’s easiest to fill them using a teaspoon. Let them cool completely, then melt your chocolate in a double broiler and fill into a piping bag and drizzle over the cookies. Let it cool until the chocolate is firm.
Print
Toffee Thumbprint Cookies
- Prep Time: 2 hours
- Cook Time: 13 minutes
- Total Time: 3 hours
- Yield: 60 1x
Description
Decadent toffee thumbprint coffees glazed with chocolate
Ingredients
Dough
- 100g hazelnuts, whole (1 cup)
- 220g butter, softened (2 sticks)
- 180g brown sugar (1 cup and 2 tablespoons)
- 2 large eggs
- 1 vanilla bean
- 1/2 teaspoon salt
- 320g all purpose flour (3 cups)
- 1/2 teaspoon baking powder
Toffe
- 150g brown sugar (3/4 cups)
- 150ml heavy cream (1/2 cup and 3 tablespoons)
- 40g butter (3 tablespoons)
- 250g semi sweet chocolate (8.8 ounces)
Instructions
Dough
- Prepare two baking trays, fitting them with parchment paper.
- Chop the hazelnuts into small pieces and put into a deep dish.
- Cream together the sugar and butter with a hand-mixer until creamy, for about 2 min.
- Add in the eggs, vanilla bean, salt, flour and baking powder and keep mixing until a homogeneous dough forms.
- Preheat your oven to 180° C.
- With a teaspoon, take out a small portion of the dough and roll it between your hands until you have a round ball. Make your hands wet first for easier rolling.
- Then roll your ball into the chopped hazelnuts until evenly coated.
- Set it down unto the parchment paper and dent it in the center with your finger.
- Do this with the whole dough and bake for about 13min on the middle rack.
- Let them cool completely.
Toffee
- In a non-stick pan, bring the sugar, heavy cream and butter to a boil.
- Reduce heat to low and let it cook, stirring constantly, for 5-10 min until it starts to thicken.
- Fill the toffee into the center of your cookies, working quickly as the toffee will thicken as it cools. Let it set until firm.
- In a double broiler or electric melting pot, melt the chocolate.
- Fit your piping bag with a small round tip (Wilton 1,2, or 3 round tip) and scoop the bag over a tall glass.
- Fill the chocolate into the bag and pipe lines unto your cookies. Let them cool.
Notes
These cookies last for about 3 weeks in airtight containers or cookie jars. You do not need to store them in the fridge. Recipe adapted from Frisch Gekocht
MORE FROM MY SITE
Disclosure: This post may contain affiliate links, but these are all products I highly recommend. I won’t put anything on this page that I haven’t verified and/or personally used.
Tagged With: caramel, chocolate, cookie, cookies, thumbprint, toffee
Filed Under: Cookies, Dessert, Seasonal, Winter & Christmas Recipes